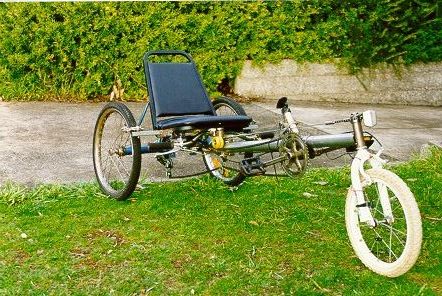
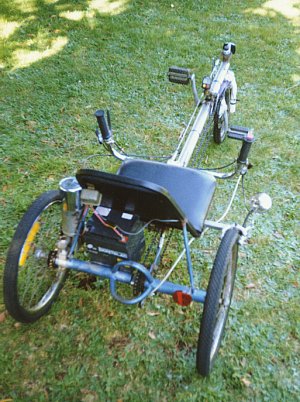
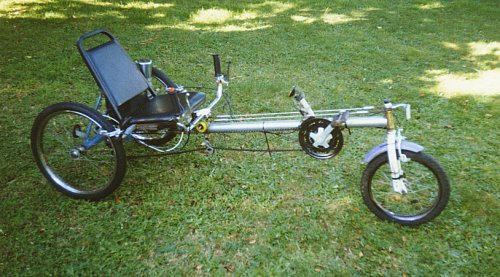
 I have been working on this
trike for quite a while now after finding an old upright trike
for sale in a bike shop. It's only part finished, the picture
showing some of it's progression.
I have been working on this
trike for quite a while now after finding an old upright trike
for sale in a bike shop. It's only part finished, the picture
showing some of it's progression.
I have been working on this
trike for quite a while now after finding an old upright trike
for sale in a bike shop. It's only part finished, the picture
showing some of it's progression.
The rear end on this sort of trike I have found difficult to
design so it could be easily made in my workshop with very
limited tools and here it was all done for me. I would have liked
to have the 2 rear wheels driving but that isn't easy using what
already is here and it doesn't seem to pose problems riding. This
would mean having some sort of differential usually having a cog
with inbuilt ratchet on each wheel and a jack-shaft. My first
design idea was to have an intermediate hub as shown in the 2
pictures. It was to be a normal steel hub with 5 speed cluster
plus another cog welded to the spoke flange connecting by chain
to a cog on the rear axle. This didn't end up so easy to get
working properly so I fiddled a bit 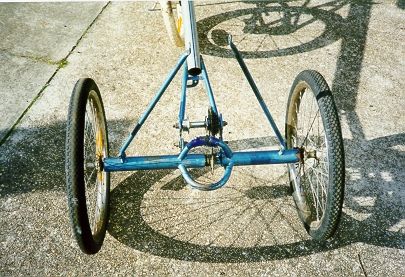 and got the cluster to fit on the back
axle instead.
and got the cluster to fit on the back
axle instead. 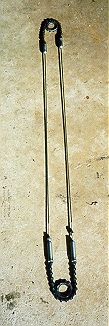 The problem was
trying to stop the forward going chain fouling the rear forks.
The rear axle dia is the same as a normal bike 3 piece pedal axle
so a cottered pedal crank has the arm cut off then the threaded
part of a rear hub welded to it. I found out doing this that the
threaded cone nuts on a bike BB is exactly the same thread and
size so this could be used instead of wrecking a good hub. The
cassette is screwed onto this unit, a flat section is filed into
the rear axle for the cotter pin to hold the assembly firm. The
left rear wheel has a long axle fixed to it running up through
the cluster and into a sealed bearing on the other side of the
cluster. On this one the right wheel has
The problem was
trying to stop the forward going chain fouling the rear forks.
The rear axle dia is the same as a normal bike 3 piece pedal axle
so a cottered pedal crank has the arm cut off then the threaded
part of a rear hub welded to it. I found out doing this that the
threaded cone nuts on a bike BB is exactly the same thread and
size so this could be used instead of wrecking a good hub. The
cassette is screwed onto this unit, a flat section is filed into
the rear axle for the cotter pin to hold the assembly firm. The
left rear wheel has a long axle fixed to it running up through
the cluster and into a sealed bearing on the other side of the
cluster. On this one the right wheel has 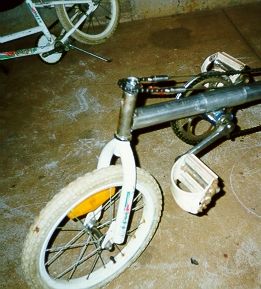 an axle that screws into a
floating nut contained inside the rear axle assembly. It would be
easier made as shown in the drawing. I
have a gap between the left wheel and it's nearest bearing so I
can mount another cog. This will be connected to an electric
motor that has on it's shaft a cog with a ratchet built in
an axle that screws into a
floating nut contained inside the rear axle assembly. It would be
easier made as shown in the drawing. I
have a gap between the left wheel and it's nearest bearing so I
can mount another cog. This will be connected to an electric
motor that has on it's shaft a cog with a ratchet built in 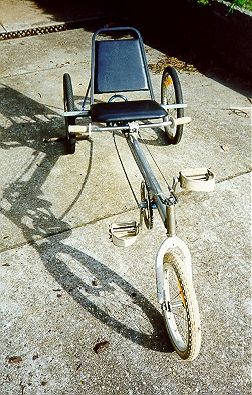 allowing
it to freewheel.
allowing
it to freewheel.
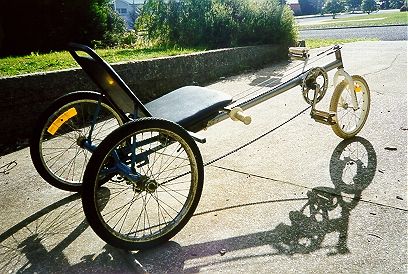
With the length of the wheelbase there is noticeable flex in the boom when I sit on the trike. The flex affects the steering loop mainly making it slacken a little when I'm seated but does also give some degree of suspension but I don't expect it to be a a problem in the future.
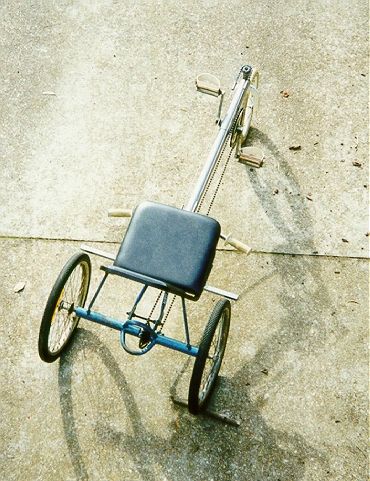
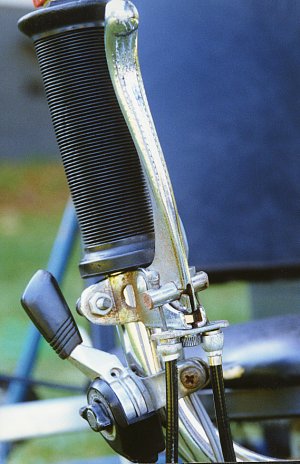
The steering is a closed loop using stainless steel rods and
bike chains at each end. 2 small cogs are mounted on the steering
head and handlebar steering arm. On a bike steering head there is
usually a small keyway the holds things like the front reflector
bracket straight. A small washer usually found in bike steering
heads with this keyway is welded inside the small steering cogs
and are held on 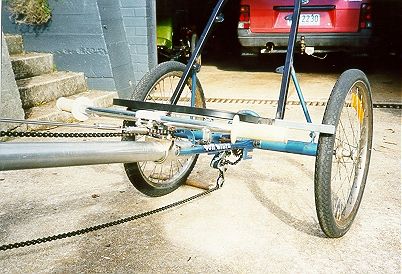 in the usual way. The
handlebar steering assembly is as shown in option 6 on the my under seat
steering mounting page. The only difference is I have used a
'clam shell' steering head assembly to hold the handlebars on
instead of what's shown on the drawing. It hasn't been easy
getting the handlebars clear of the chain on all gears as both go
below the seat and above the boom. 2 skate wheels have been
fitted to route the chain. Not knowing what angle to make the
steering head I ended up setting it temporarily to the same angle
as the 16" bike the forks and wheel came from. This has
proved too steep for the closed loop steering as the chain isn't
straight with the steering cogs. The front steering tube is only
tacked on so I will shorten the wheelbase slightly and make the
rake more vertical. Many of the commercial HPV's of this style
have 20" wheels all round. With this setup I don't like the
angle of the boom with a 20" front and the it makes the
pedals higher than the seat. I much prefer exactly the opposite
so am stuck with a 16" front for now.
in the usual way. The
handlebar steering assembly is as shown in option 6 on the my under seat
steering mounting page. The only difference is I have used a
'clam shell' steering head assembly to hold the handlebars on
instead of what's shown on the drawing. It hasn't been easy
getting the handlebars clear of the chain on all gears as both go
below the seat and above the boom. 2 skate wheels have been
fitted to route the chain. Not knowing what angle to make the
steering head I ended up setting it temporarily to the same angle
as the 16" bike the forks and wheel came from. This has
proved too steep for the closed loop steering as the chain isn't
straight with the steering cogs. The front steering tube is only
tacked on so I will shorten the wheelbase slightly and make the
rake more vertical. Many of the commercial HPV's of this style
have 20" wheels all round. With this setup I don't like the
angle of the boom with a 20" front and the it makes the
pedals higher than the seat. I much prefer exactly the opposite
so am stuck with a 16" front for now.
The BB mount is semi-permanent using exhaust tubing. I found the next size up exhaust tubing to the boom slips just neatly over the boom. Another piece is cut in half as a removable top cap. This is held on by assembling it all on the boom and then drilling the hole for the bolt. All is then removed and the nut welded into the boom flush with the top of the boom. The angle and position of the derailleur mount needs to be correct for the chain to de-rail properly. I welded 2 gussets to help support the BB as I'm not sure it would be strong enough without. There's a lot of force at this point when pedaling.
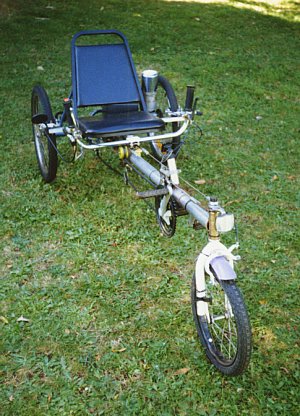
Seat is a kitchen chair, modified a little. The front bottom bracket is welded to a tube that slides over the main boom. A 1/2 tube fits over this at the top with the front derailleur tube welded to it and is bolted in 2 places to the boom allowing it all to be semi adjustable. (A nut is set into the boom and welded) It's length looks deceivingly long being the same wheel base as the S&B Speedster and 10 cm shorter than the Comfortcycle Chaise.
 |
 |
 |
|
|
|
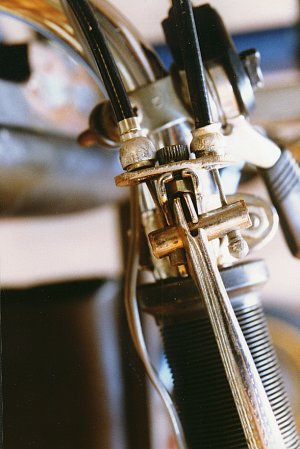
The trike has the potential to have 3 calliper brakes so I've
tried an arrangement where one lever works the 2 back callipers
and the other the front. See pic 1 and
pic 2 & drawing.
In all it only took about an hour to make this temporary
prototype so I'm quite pleased with it. Uses a normal bike
handbrake assembly. A small metal plate is added to take the 2
cables. It's held in place by a bolt and nut mounting through the
ex cable hole. Also have a look at the Optima Trike Pic
1 & Pic
2.
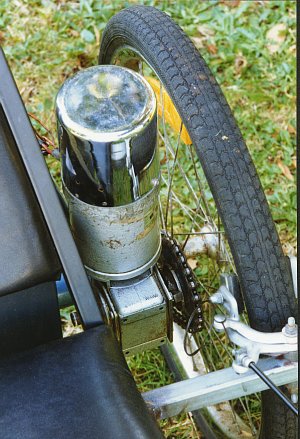
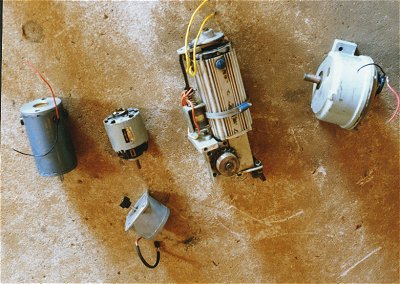
In the past while, I've been playing around with the idea of giving the trike motive power of some kind.
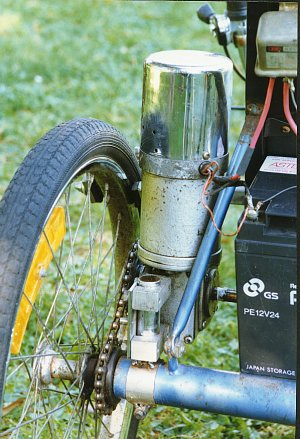
Shown here is a wheel chair motor/gearbox of unknown rating out of a choice of a few I had lying around. (but I guess it to be about 12v)
I bought them from Astec Equipment Services, a company that repairs, reconditions and customises Wheelchairs and other disability equipment and recycles electric motors and batteries suitable for Power Assisted Bikes. Prices are very cheap, EG deep-cycle batteries are $20 2nd hand and motors not much more so are excellent for playing around with ideas.
Astec Equipment Services, 1213b Sturt St, Ballarat, Victoria, Australia, 3350, Ph 03 53324098, Mobile 019 433846, Email: astec@vic.australis.com.au
The motor really doesn't draw enough current at present(about 15 amps at close to stall) on 12 volts so I'm considering trying 24 v, the problem is this adds more weight.
19th October 1999 This motor/gearbox is now being tested on a Power Assist Trailer.
|
|
A bike clutch ratchet is mounted on the rear axle. This allows the trike to freewheel when not using the electric motor. There was one unexpected downside to this that is very annoying. The motor has a friction brake at the top (under the chrome cover) that is released by a solenoid at startup. This makes it impossible to roll the trike backwards as the clutch added only goes one way. I find this very annoying, especially navigating in traffic as well as parking and often have to pick up the back end to manoeuvre it. A piece of exhaust tubing was used on the main axle. It was split and a long nut welded across the gap. The nut is then cut in half and one side drilled out making this an adjustable clamp. With the riser tube welded to it the motor can be moved up or down to adjust the chain tension. |
|
The U shaped handlebars added make it a lot more comfortable to ride than the straight ones shown above. They were taken from an upright exercise bike, with the 2 bars welded together in the centre. |
|
|
|
|
|
| All of the electric's are just mounted temporarily at present. The relay is one often used for car spotlights. Battery is really too big (read heavy) being a deep-cycle 24AH. Really the motor is too heavy as well for any type of speed. | 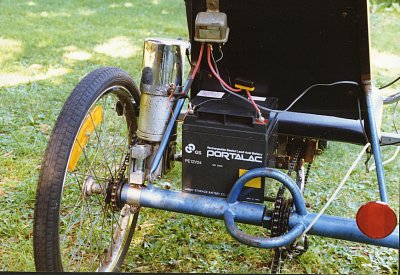 |
| Wheel Base | 1475 mm |
| Track | 660 mm |
| Rake | 16 degrees |
| Trail | 19mm |
| Seat Height from ground | 410mm |
| Seat angle from bot to back | 105 degrees |
| Turning Circle | 5.5 metres |
| Total height | 750 mm |
| Total length | 1920 mm |
| Front cogs | 28-38-48 teeth |
| Rear cogs | 14-17-20-24-28 teeth |
| Gear inch | 69-20 |
| Front BB height to axle centre | 400mm |
| Wheel size | 20" rear, 16" front |
| Crank Length | 175mm |
| Weight Distribution | 66 % rear, 34 % front |
[ Home ] [ Ally] [Stamp FAQ] [ HPV Index ] [ Design overview ] [ Bike 1] [ Bike 2] [ LWB Bike] [ SWB Trike ] [Electrified 20" Tadpole trike] [ Childs Trike ] [ SWB Trike 2 ] [ Electric Trike ] [ RWS Trike ] [Delta Trike] [Childs Hi-Wheeler] [ Bike Trailer ] [Recumbent bike trailer] [Power Trailer] [ Steering Diags ] [ Steering Mounting] [ Kingpin Diags ] [Novel HPV Ideas] [ Australian HPV Resource ] [ Links ] [Power Assist] [ Unusual Vehicles ] [ Electric RC Models ] [ EV Circuit Diags ] [Tas HPV] [QLD PP] [Qld HPV] [Skycycle] [Bleriot] [Building HPV's] [Darryl] [Null Modem] [ Pedalezy ] [ USPD ] [Zeta] [Power Attachment] [Email]
Friday, January 30, 2009
