Thunderbolt Design Review
Written By Rickey M. Horwitz
Revision. 2.6
February 5, 2000
Notice
The material contained in this section is protected by U.S. copyright laws. Any unauthorized duplication or publication of the material contained in this section is prohibited by law.

The Background of the Thunderbolt
Up until the release of the Zephyr Mk I (May 1994), I had never bothered to study another production recumbent trike. My first encounter with any recumbent trike was Mike Burrow's Windcheetah found in Richard Ballentine's Ultimate Bicycle Book. I was so impressed by the design's utter simplicity and styling that I went to work designing a trike with similar traits.
The newly designed trike was originally dubbed 'Mariah' and was intended as an OEM to EcoCycle as the next generation Trice. However, the deal fell through and I was stuck with a product I didn't have a market for. In 1996, my Zephyr Mk III increased in cost and I wanted to offer a product that was a bit more practical and affordable. Therefore, I tweaked the design a bit, renamed it the 'Thunderbolt'.
The Thunderbolt or "T'bolt" as I nicknamed it, is a very high performance, low cost trike. Sadly, it was not until I closed my business, that the recumbent market realized the potential of this product. In almost every category, it was superior to anything available.
As the recumbent industry releases improved products over the last four years, the value of the venerable Thunderbolt design was bound to lose some appeal. To stay on the competitive edge, several refinements have been made from the original design. As a result of these improvements, the Thunderbolt specification now competes on the same level as any of the leading trike manufacturers. A list of improvements include; steering geometry, weight distribution, lower center of gravity, and a much lighter frame.
Many neophytes may think that this Thunderbolt frame is too complicated. The design of both the Thunderbolt and Zephyr emphasize on artistic quality that goes much deeper than most simpletons can admire or comprehend. I don't claim this project is for the average homebuilder, as it is a terrific undertaking. However, if the trike is built to the specification outlined in the drawings and instructions, I am confident that you will be extremely satisfied with the results.
Work Required
The art of bicycle frame building is not for the faint hearted. Additionally, building a complex Cycle Car is no easy undertaking either. To complicate these matters, the Thunderbolt design requires lots of fabrication details. I have attempted to simplify this project, but found that few shortcuts (deviations) from the original design could be made. Novice frame builders may find this project challenging. Improvising is a necessity, as materials and tools may not always be available. Although, a well-designed jig insures near perfect results, such a tool is a luxury, as it requires precise fabrication. Consequently, the builder must improvise for these shortcomings too. The purpose of this project is to build a recumbent trike with as little resources and time possible. I don't expect to get into specifics on time consuming apparatuses such as frame fixtures. These items require painstaking detail and are normally reserved for individuals who have advanced skills and machinery.
This is a living document. I change the specifications and material requirements as required and at any time. If you feel the documentation is too confusing or I have left something out, contact me so that I can make the corrections. RMH
Aluminum Construction
The lightest and strongest frames ever built are fabricated from aluminum. The Thunderbolt can be built easily under 31 lbs. using a heat treated aluminum frame (the production versions weighed <35 lbs.). I understand that many homebuilders do not have experience with aluminum fabrication. However, changing my design to adopt steel would have been too time-consuming and I saw no value in it for myself. I have included some deviations for steel fabrication, but I cannot verify if the numbers are correct. I want to emphasize that the aluminum design requires a post heat treat. If this is not done the frame will be weak and ultimately fail. If a post heat treat cannot be had, increase the wall thickness of all tubes 25%. BTW-a .065 wall aluminum frame is sturdy enough for 225 lbs. .085 frame is good for 275 lbs.
Single Frame Fits All
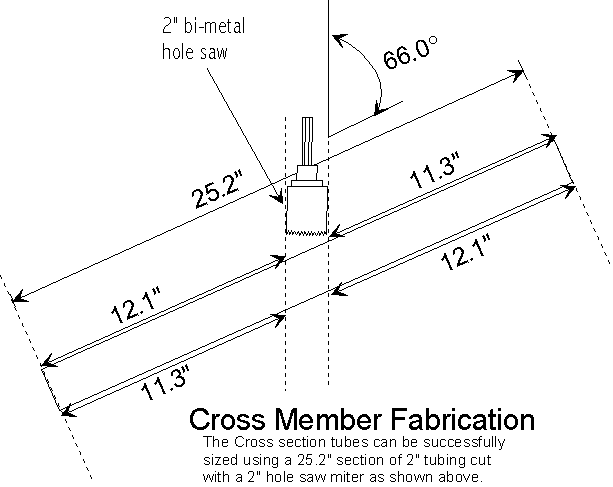
Originally, I built two sizes of Thunderbolt frames, large and small. Obviously, this would require two set of plans. To reduce the confusion, the plans focus only on a modified version of the large frame (shorter boom using a lower angle) . The frame can be easily modified for smaller people (those having an inseam less than 32") by adjusting modifying the angle of the cross members so that the bottom bracket is elevated for adequate heal to ground clearance.
Angled Cross-member
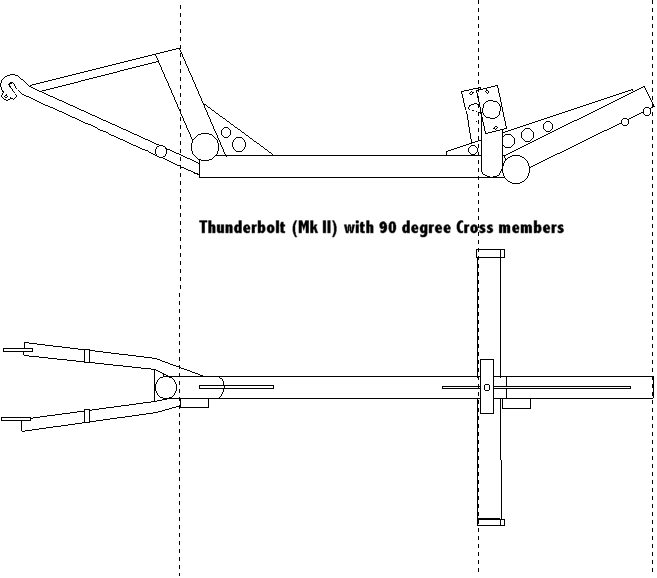
The 114-degree angled Cross-Member was originally intended for the Zephyr Mk II and Mk III. This angled cross-member allowed the sliding bottom bracket assembly to move fully aft. Since the original Thunderbolt used the same fixtures as the Zephyr, this design attribute was copied. Although there is nothing structurally wrong with the design of this cross-member, it can be simplified to a 90-degree structure. An obvious virtue of the 90 degree system is that it allows simplistic approach to building the trike. The steering knuckle levers can be reduced decreasing weight and adding reliability.
When reviewing the drawings you may encounter 110-degree vice 114 degree. During the documentation, I inadvertantly recorded the angle incorrectly from my notes and placed this error on most of the drawings. it wasn't until a recent audit that this error was discovered. Therefore, treat the 110° as 114°.
Adjustable Steering Geometry
Almost all production trikes use fixed geometry system. A fixed geometry means that neither Caster or Camber is adjustable. The most common method for securing the Kingpin to the tricycle frame is by using a standard bicycle headset. Obviously the tube interfacing with the inner race of the headset represents the Kingpin. The Kingpin secures the steering knuckles using a single-ended cantilever design. Although the materials for these steering systems are universal, they do not allow any geometry changes to the steering.
The Thunderbolt, Zephyr Mk II and Mk III all used Rod-End Bearings as a way of securing the kingpin to the tricycle frame. These bearings have proven to be extremely reliable and effective. I first got the idea of using rod-ends from a local Go-cart shop. In fact most of what I learned about recumbent tricycles, I learned from the knowledgeable people at Cal Karts in San Jose, CA. I figured if these bearings were tough enough for Quarter Midgets, they must be good for recumbent trikes too.
Another reason I chose to use the adjustable rod-end bearings was to compensate for the frame distortion caused by heat treating process of the aluminum frame. Since the usage of these bearings allows very loose tolerances, extreme trike frame alignment will not be a critical issue.
Rear Wheel Triangulation
Several Trike designs notably the Terra Trike, Dragon-Flyer, early Trice (US and early UK models), Landstrider, Rubicon and Windcheetah do not use a seat tube and/or seat stays to add support to the rear wheel. The flimsy chain stays results in a wheel that flops during hard cornering (commonly known as side loading effect). Although all these manufacturers dismiss this anomaly as benign, it does compromise the trikes handling capability and can lead to early frame failure. Designs such as the new Crystal Engineering Trice and the Greenspeed GR20/20R are both fine examples of sturdy rear-end design.
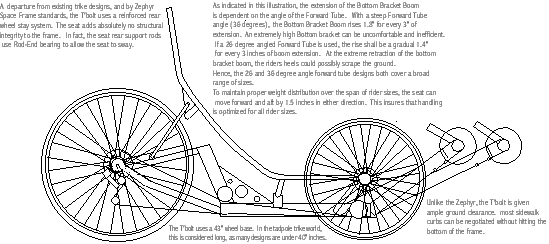
To reduce rear wheel flop, the Thunderbolt uses a fully triangulated rear stay system. The weight penalty is only 10 oz, and the overall rear stiffness is excellent.
Webbed Gusset Reinforcements
Web gussets add structural integrity to the trike design preventing it from flexing and from early frame fatigue. CroMo trikes are allowed to flex without fatiguing, so these structural supports are not as common on steel frames. The T'bolt uses a total of three of these structures to insure extended reliability of the frame.
Chain Management
The T'bolt uses a two set roller system. If I had the opportunity for a redesign, I would convert the system for a single roller system.
Removable Seat
With the seat removed, a T'bolt can be shipped UPS, or can be placed in the trunk of a car if needed. Additionally, the seat offers no structural support to the frame, hence it not required to permanently fasten it.
We Have a Seat!
The seat for Thunderbolt requires a special fixture and detailed instructions. At first, I saw no value in it for myself as these instructions were too complicated. After much thought, I took the the plunge and painstakingly detailed the instruction for fabricating the seat. These plans have been released.
As before, a Lightning Stealth seat (or any seat with a 2" tube mounting and stay mounts) can also be used for this project.
Upright Seat Position
Some Greenspeed and Windcheetah customers claim that the steep 35 or even 30-degree position of the seat is much more comfortable than an increased upright position. I refuse to argue about religious subjects such as seat angles. However, lying on your back impairs your vision, and lowers the visibility of the trike, hence creating a potential safety hazard. As for efficiency, the steep angle does reduce the overall frontal area of the trike, making it increasingly aerodynamic. However, this steep position does not make pedaling more efficient.
Single Tiller
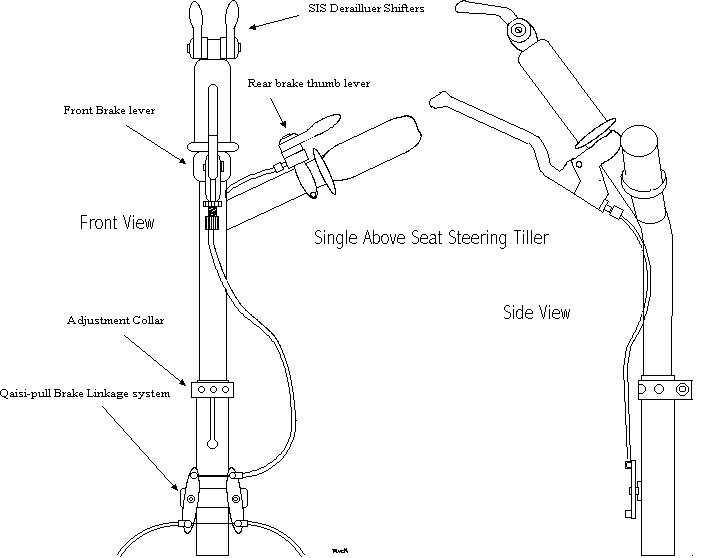
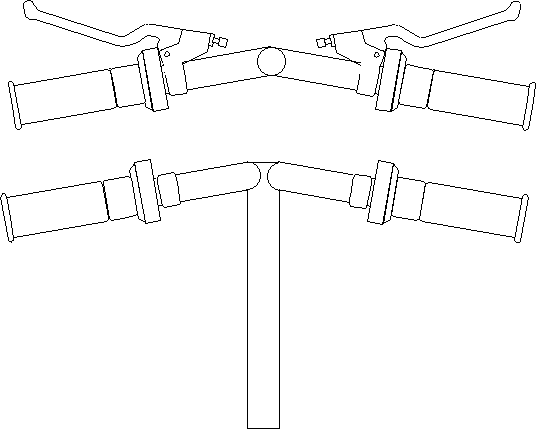
I designed an articulated single handled tiller back in 1994-95. The design was based upon the Windcheetah steering mechanism with some radical changes (see above). For a more conventional approach, I have a simple 'T' bar design that uses standard grip shift (see image below). I will also offer plans for an under-seat steering similar to the one used on the production version of the T'bolt. However, it is mechanically complicated and adds an extra 1 lb. to the trike.
Absolutely Painless Steering and Braking System
The most challenging problems building a trike is fabricating the front steering system. After all, modifying a Sachs drum brake hub to accommodate a single ended axle is not a task easily accomplished by the average enthusiast. Secondly, fabricating the intricate steering knuckle to accommodate a drum brake is equally difficult. I understand that most people interested in this project wouldn't want shell out $200.00 for a pair of unmodified Sachs brake hubs. Obviously, there is a risk involved here. In fact, some trike manufacturers don't have the know-how to design or build a front brake systems for a trike. Instead of capitalizing on your shortcomings, I have redesigned a new front wheel system that uses standard BMX wheels and axles and standard caliper brakes. This new steering system which I have coined the "Cantilevered Stirrup System" is the most practical approach ever conceived. The system weighs only a few ounces more than the more elaborate designs found on the expensive trikes. The geometry and braking performance rivals that of conventional designs using drum brakes. Best of all, fenders can be easily fitted and the system is very cheap and simple. The only draw back to this system is that I have never tested the prototype. If this unproved design appears questionable to you, I suggest sticking to the conventional method using the Sachs hubs as outlined in this document.
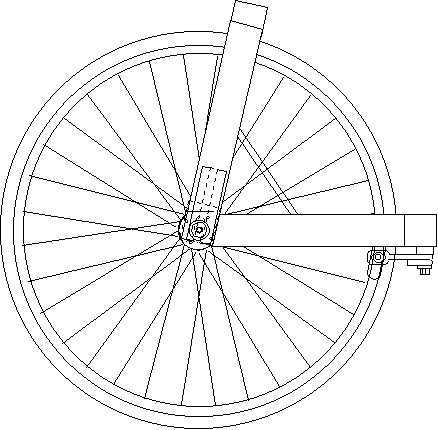
The Stirrup design allows use of standard caliper brakes and BMX wheels
Thunderbolt Configurations
The Thunderbolt project is offered in many different configuration. Currently, these configurations affect steering, braking and frame geometry. The list below itemizes the different configurations and requirements.
Frame Type
Steering Type
Brake Type